

Brian's Best Bang 4 Buck Proxmox Computer Build
If you want me to install any apps for you, my system makes it really easy
for you to pick and choose which ones you want installed with check boxes. But
you'll have to login (up top) for this which is quick & easy using Google or Facebook.
Proxmox is an Operating System that specializes in managing
other Operating Systems AKA Virtual Machines OR VMs for short.

How Is This Possible?
Basically, you're able to remotely connect from a slow computer to the Proxmox Host FAST Computer through your browser of choice over WiFi or Ethernet. I prefer Firefox or Brave. Once your slow computer is connected to the Proxmox Host, you're able to full screen one of the Windows VMs ( Virtual Machines ). Then the vast majority of the computing that happens actually happens on the Proxmox Host FAST Computer ( not the slow computer ). This is just one of the many benefits of virtualization.
If you live nearby me @ 40th St & Greenway & order
the parts I'll build this computer for you for $300 bucks.
Then I'll install and configure Proxmox for another $300.
Then Windows can be used as a template and simply be cloned.
Click on the thumbnails below to visit the Amazon product pages.
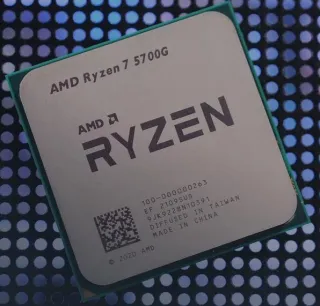
AMD Ryzen really has the market cornered on best bang for the buck CPUs being used for servers and virtualization. The Ryzen 5700G CPU has 8 cores but 16 threads. Proxmox requires 2 cores per Windows VM. But it considers each thread to be a core! So even though this is only an 8 core CPU, Proxmox recognizes it as a 16 core CPU! This is amazing because it means you can basically run 7 Windows VMs simultaneously! I recommend leaving some cores available to handle other things like running the Proxmox OS. Look at these screenshots I took. I have 6 Windows VMs running at the same time on 1 Proxmox computer...
https://storage.googleapis.com/msgsndr/1xxad1OXh4QBeAfc6xAf/media/68d9bdb84c35d62f5b9945fe.jpeg
https://storage.googleapis.com/msgsndr/1xxad1OXh4QBeAfc6xAf/media/68d9bdb8337bbf164a5373d2.jpeg
In the above photos you can see that the 6 Win11 VMs are using 10 GB RAM each. 60 GB RAM combined. There's 64 GB RAM total installed on the system. 10 GB RAM is not really enough to run Win11 on efficiently. So, if you're going to run this many VMs I recommend installing 128 GB RAM total on the computer. I recommend assigning 20 GB RAM to each Win11 VM. This will give you a pretty healthy amount of RAM. Then remember to leave some RAM unassigned to give Proxmox some RAM to work with as well. 2 GB RAM minimum for Proxmox OS & VE services. Plus designated memory for guests. For Ceph or ZFS additional memory is required, approximately 1 GB memory for every TB used storage.
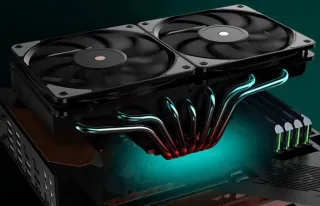
I think Dual CPU Fan's are well worth the extra money. It's only a matter of time till a fan stops spinning and when they do they stop cooling as well. Well, both fan's aren't gonna quit @ the same time. Right? So, just in case 1 fan stops spinning, the other fan will continue to cool your precious CPU until you have the dead fan replaced with a new one. I've had a CPU fan quit on me before and I didn't even know how long ago it quit because I couldn't see the 1 fan since it was sandwiched in between the heat sinks. Fortunately my CPU didn't fry. I just noticed it was performing sluggish in a game one day and decided to undo some screws to investigate and make sure. This Dual Fan can definitely save your CPU when it's under load! And make it look pretty stylish too if it's RGB :))
After it's installed then it's just a matter of checking to see if the fans are still spinning. It's pretty easy to see the front facing fan. Especially if you have eye sight through your case cover. If not then I guess you'll just have to take the cover off periodically to check. As for the rear facing fan, a nice trick is to simply mount a mirror inside the back wall of the case in order to check on it with ease.
This particular Dual CPU Fan is the only one of it's kind. It doesn't stick out nearly as far from the CPU since the 2 fans are parallel with the mobo. This compact design is what's going to allow everything to fit into a smaller Mid Tower sized case! This makes the whole computer size much smaller while still having Dual Fan functionality and peace of mind :))
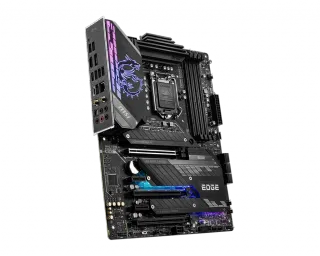
Fits Sockets: Intel LGA 1700/1200/115X and AMD AM5/AM4
So the mobo you choose is dependent on the CPU you've chosen. Choose your CPU first then choose your mobo or vice versa.
I went through tons of research to find this little gem of a mobo! I was mainly looking for ones that would support ECC RAM for server building and most of them were way over priced or Micro ATX and I wanted Full ATX. This one is Full ATX, supports ECC RAM, Dual M.2 Slots, WiFi and supports CPU integrated graphics with a HDMI 2.1 and DisPlayPort 1.2 (4K@60HZ). All this for roughly $150 bucks at the time I bought it! It's an absolute steal!
https://www.youtube.com/watch?v=RccSRHgaE7s
https://storage.googleapis.com/msgsndr/1xxad1OXh4QBeAfc6xAf/media/686e87338796627a9c45b8af.png
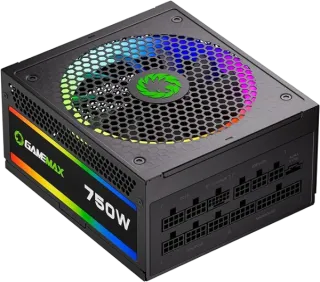
It's better to have too much power than not enough! This PSU outputs up to 750 Watts which should be plenty of power unless you plan on doing some really hard core gaming with a very large GPU. Also the cables are modular which means only the cables that are needed will be used which of course will result in a minimum amount of clutter inside the case. Include the ARGB lighting effects @ a reasonable price and this one's an all around winner! It's also 80 Plus Gold Certified with 105°C Japanese Caps.
Get the 2x32 GB Sticks for a whopping 64 GB total! That's enough to start with. You can add more later if needed. Just be sure NOT to get anything LESS than 32 GB Sticks! There's 4 RAM slots in the mobo so with 32 GB sticks you'll have a max of 128 GB RAM!

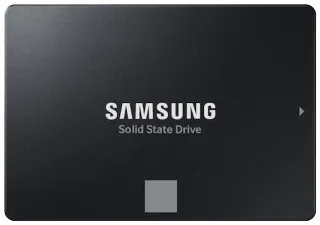
Hard Drives » 870 EVO 1TB 2.5 Inch SATA III Internal SSD
1 TB of lightning fast hard drive speed! I prefer pairing 2 of these EVO SSD's in an internal hot swap cage for dual 2.5" SSD's located in one of the 5.25" storage bays on the front of my computer case which lets me have incredibly easy access to them without going inside the case to get them. 1 drive can mirror the other drive in several different backup methods. I prefer using XCopy! It's quick, easy and free since it's built into Windows. It's also able to be automated using Windows Scheduler.
Note: You'll also need this 3.5" to 5.25" Front Bay Adapter to fit the hot swap cage in there.
Below you'll find a copy of my own personal XCopy backup script. Simply open it up with an editor of your choosing. I use Notepad++. Light weight, tons of features such as tabs, code highlighting and dark background themes and it's free to use forever. Once you have it open just define your Source and Destination paths. Save and then double click on the file icon and the script will run and back up your data : )
1) Copy & Paste the following code into a new text file.
2) Rename the file something like » BackUp Data.cmd
Note: You'll have to enable Windows to Show Hidden File Extensions in Folder Options.
3) Open it up in your text editor and change the 2 paths in the XCOPY line near the end.
4) Save and Double Click the CMD file and it should start backing up your data! Enjoy : )
Note: REM is short for REMARK. Any line that starts with REM will be ignored from the lines that actually run when the CMD file is activated. REM is used to write notes inside the CMD file. Also, the file extension can be named BAT as well. Both CMD and BAT files are known as Batch files when they're spoken of.
Copy This Code...
@ECHO OFF
REM - XCOPY Notes...
REM - /C = Continue Even If Errors Occur
REM - /D = Only Source Files Newer Than Destination Files Will Be Copied
REM - /F = Displays the full path and file name of both the source and destination files being copied.
REM - /H = Hidden & System Files Will Be Copied
REM - /K = Use this option when copying read-only files to retain that file attribute in destination.
REM - /R = Override Read Only Files
REM - /S = Also Sub Directories Will Be Copied
REM - /Y = Overwrites Existing Files Without Prompts
REM - /Z = Allows the xcopy command to safely stop copying files when a network connection is lost and then resume copying from where it left off once the connection is reestablished. This option also shows the percentage copied for each file during the copy process.
REM - Visit Page 4 More XCopy Details:
REM - https://www.lifewire.com/xcopy-command-2618103
REM - Example: XCOPY "X:\DATA\" "Y:\DATA\" /D /S /H /R /C
REM - OR Use *.*
REM - Example: XCOPY "X:\DATA\*.*" "Y:\DATA\*.*" /D /S /H /R /C
REM - To BackUp The Windows Folder Requires You To Do It From Another Drive OR Partition
REM - Example: XCOPY "C:\Windows\*.*" "Y:\Windows\*.*" /D /S /H /R /C
REM - Save BackUp CMD OR BAT File On Any Drive Other Than C...
REM - Then Run This File. Then You Can BackUp Your Windows Drive.
REM - PLEASE NOTE: THIS WILL ONLY GRAB 1 PARTITION! WINDOWS HAS MULTIPLE PARTITIONS!
REM - SO IF YOU WANT TO CLONE AN OS DRIVE IT'S BEST TO USE SPECIAL CLONING SOFTWARE!
REM - Samsung Data Migration Recommended:
REM - https://www.google.com/search?q=Samsung+Data+Migration
XCOPY "X:\DATA\*.*" "Y:\DATA\*.*" /C /D /H /K /R /S /Y /Z
PAUSE
Pretty mind blowing you can get 2TB M.2 SSDs now for nearly $100 bucks! 09/08/2025
This is what you should get to run your Proxmox OS and other VMs on!
You definitely don't want a bandwidth bottleneck here.
Wanna measure your hard drive speed?
I recommend using this free program » AS SSD Benchmark
On the Sequential Benchmark Test I'm getting 118 MB/sec Read and 113 MB/sec Write.
I know Crucial P310 isn't shown in the benchmarks list below but I'm posting these benchies to show how extremely slow hard drives were before M.2 SSD NVMe show up on the scene! This thing transfers data up to 7,100 MB/s!!!
https://storage.googleapis.com/msgsndr/1xxad1OXh4QBeAfc6xAf/media/686e87abb4318373feaed8bf.jpeg
https://storage.googleapis.com/msgsndr/1xxad1OXh4QBeAfc6xAf/media/686e87ab93349807c1b5ef7e.jpeg
https://storage.googleapis.com/msgsndr/1xxad1OXh4QBeAfc6xAf/media/686e87ab038ba845d041be88.jpeg

One of the only cases left on the market that actually has 5.25" storage bays! They are practically extinct! Can you believe it? These storage bays are sooo friggin handy! Now, they're almost completely deleted from existence on the market! Get them while you still can!
Here's a few of my favorite things you can put in these storage bays:
Internal Hot Swap Cage for Dual 2.5" SSD's
Internal Hot Swap Cage for Triple 3.5" Hard Drives
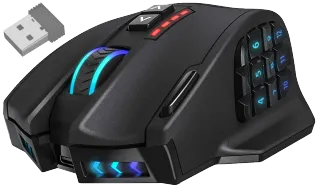
Actually, Redragon M901P-KS is EVEN BETTER! It's almost the same mouse but tracks much better on surfaces!
UtechSmart Venus Pro Mouse is by far the best gaming mouse I've ever had! And it doesn't break the bank either. They have their mouse software set up on a Dropbox account here.
Lets talk Cons first. Most settings you program can be exported to a JMK file. Then re-imported on whatever computer you like which is a pro but here's the con... The JMK file doesn't include the Custom Macros you make in the software. You can export each individual Macro to an MCK file but it's only possible to import 1 MCK file at a time (which is annoying).
To Export a Macro... Click on the Macros Tab then Right Click on a Macro from the Macro list. Select Export & Save!
To Import a Macro... Click on the Macros Tab then Right Click in the Empty Space on the Macro list and Select Import Macro!
Scroll down to get all of my backup files for this mouse.
The rest is pretty much all Pros. The Macro data once programmed is stored inside the mouse itself so this is really handy for a mouse that is already pre-programmed plugging it into a new computer. You can even switch between 2 different profiles with a Profile Switch button located on the bottom of the mouse. You could use this in case maybe you have different profiles for different games. Maybe use one profile for regular non-gaming computer usage. There's another switch there that turns the lighting effects on and off and the middle position of that switch just turns the whole mouse off completely. My previous mouse had 6 programmable thumb buttons. This Venus Pro mouse doubles that with 12! There's even a 13th extra button there next to the main left button. Also, the programming software interface is actually pretty advanced with it's powerful macro features. I programed my 13 extra buttons as shown in the image below. Learning and Using these macros on a daily basis is how you become a Mouse Master!!! Rapidly increasing your ease of happy workflow! :))...
https://storage.googleapis.com/msgsndr/1xxad1OXh4QBeAfc6xAf/media/686e87ab93349805f0b5ef7f.jpeg
https://storage.googleapis.com/msgsndr/1xxad1OXh4QBeAfc6xAf/media/686e87ab677990f46a3d30b1.png
https://storage.googleapis.com/msgsndr/1xxad1OXh4QBeAfc6xAf/media/686e87ab3e1a25530e7d9abe.png
https://storage.googleapis.com/msgsndr/1xxad1OXh4QBeAfc6xAf/media/686e87ab6e4a64de7fbcda7e.png
https://storage.googleapis.com/msgsndr/1xxad1OXh4QBeAfc6xAf/media/686e87ab627f3935d80f277c.png
Favorite Browser AddOns...
All the tools you need to grow in one place.

AI Reviews
Automate your online reviews with a few simple clicks & have Trainable AI Agents respond to reviews so you don't have to.

AI Messaging
Manage your messages with a single Unified Inbox for text, WhatsApp, Facebook, Instagram, Google, and Webchat.

AI Webchat
Convert more website visitors into leads & sales conversations with a Trainable AI Webchat Agent that answers FAQ.

AI Voice Agents
AI Voice Agents answer the phone 24/7. They sound nearly the same as humans while harvesting caller info, inserting database contacts then emailing you reports.

CRM
Grow your audience & know where
new leads are coming from in our integrated Customer Relations Management Software.

Missed Call Text Back
When you're away, have 3DQuicky follow up via text to get a conversation going.
Using cutting edge computer technology we are able to
3D Model and 3D Print very complex shapes or designs.
3D Printing...
The 3D printing process builds a three-dimensional object from a computer-aided design (CAD) model, usually by successively adding material layer by layer, which is why it is also called additive manufacturing. The term "3D printing" covers a variety of processes in which material is joined or solidified under computer control to create a three-dimensional object, with material being added together (such as liquid molecules or powder grains being fused together), typically layer by layer. In the 1990s, 3D-printing techniques were considered suitable only for the production of functional or aesthetic prototypes and a more appropriate term for it was rapid prototyping. As of 2019, the precision, repeatability, and material range have increased to the point that some 3D-printing processes are considered viable as an industrial-production technology, whereby the term additive manufacturing can be used synonymously with "3D printing". One of the key advantages of 3D printing is the ability to produce very complex shapes or geometries, including hollow parts or parts with internal truss structures (aka infil) to reduce weight, and a prerequisite for producing any 3D printed part is a digital 3D model or a CAD file. The file types we currently work with are typically psd, f3d, f3z, stl, gcode and ctb.
The most-commonly used 3D-printing process (46% as of 2018) is a material extrusion technique called fused deposition modeling (FDM). While FDM technology was invented after the other two most popular technologies, stereolithography (SLA) and selective laser sintering (SLS), FDM is typically the most inexpensive of the three by a large margin, which lends to the popularity of the process. SLA Resin has a much higher level of Dimensional Accuracy (0.01mm) in comparison to FDM (0.2mm) and SLS (0.3mm). SLA Resin printing makes it possible to print parts with little to no noticeable layer lines. If there are layer lines visible, the resin is easily sand-able to a smooth finish whereas FDM filaments such as PLA, TPU and Nylon are NOT sand-able to a smooth finish. This makes it possible for a resin printer to produce highly intricate parts that are able to go straight to market. This means it's possible to completely skip the whole expensive injection molding process! Sometimes this is even possible with FPM as well.
SLA Resins are a wide variety but most of them are very difficult to work with because they're only able to be cleaned off of surfaces with IPA (Isopropl Alcohol). Some resins are so annoying IPA does not even clean them off. However back in 2019 a new kind of Water Washable resin hit the market that solved this problem. Now it's quick and easy to clean up resin using only water. Preferably you'd use a cloth or paper towel though as well. Another problem that made it difficult to work with SLA Resins was the stinky odor it would give off. Now the odor in most resins is so low it's barely noticeable. In my experience I only barely notice it when I open up the lid of the printer after it's printed and often times I don't even notice it then at all. We currently only work with Water Washable resin. We only buy black, grey, white and clear colors which might sound very limiting, however white and clear resin dye's very easily which allows us to make pretty much any color we want. Dying white makes a variety of solid colors whereas dying clear makes a variety of translucent colors. These 2 colors have the ability for light waves to pass through them. The Translucent colors look especially beautiful when light is passed through them.
Explore A Better Way To Grow!
Do not hesitate to contact me to discuss a
possible project or learn more about my work!
Brian Mulloney (Owner)
I'm usually available in afternoons
Text my direct cell any time.
(602) 405-8586 Direct Cell
Easily Integrates With Leading Apps


Book a Demo
You're not just on another 3D Printing site, You're in Brian's World! Check the menu! Soak Up & Apply the Knowledge!
Copyright 3DQuicky 2026 -- All Rights Reserved